
Welcome to DS2.ai!
Easy to build the customized AI model with SOTA algorithms by MLOps based active learning process and also Easy to use SOTA models including OCR, GPT, STT, TTS, Text to image, Translations, etc.
DS2 is a data science platform that automates machine learning pipelines and prescriptive analytics.
Easy to use SOTA models including OCR, GPT, Image to Text, Translations, Etc.
Manual & Auto Annotation Tools (Tableur, Text, Image, Recommeder system)
ML & DL Training (Pytorch, Tensorflow, XGboost, etc)
AI Aalytics (Prescriptive analysis and Data analytics with Metabase)
AI Model Deployment and monitoring
Use Active learning process
API & Python SDK Support
Step 1 : Install DS2
1-1. Windows Or Mac
Go to the link (https://www.docker.com/products/docker-desktop/) and install Docker Desktop.
Download the docker-compose.yml file below, create an empty folder, and put it in it. docker-compose.yml
After opening a terminal, navigate to the folder containing docker-compose.yml and run the following command.
After successful installation, you can connect to http://localhost:13000 and run ds2.
After the initial installation is completed, you can connect after the update takes about 3 to 5 minutes.
This installation method allows using CPU resources (not support GPU). It does not support Object recognition model and Auto-Labeling. (Object recognition and Auto-Labeling function only works on GPU. It requires Linux OS and built-in Nvidia graphics card)
* If you want to delete it, execute the command below to complete the deletion.
1-2. Linux (Ubuntu, CentOS or Windows WSL2 - Ubuntu 18.04)
Execute the following script to proceed with the installation.
After successful installation, you can connect to http://localhost:13000 and run ds2.After the initial installation is completed, you can connect after the update takes about 3 to 5 minutes.
* If you want to delete it, execute the command below to complete the deletion.
If nvidia-driver is not installed, object recognition artificial intelligence generation and auto-labeling are not possible. (Available only if Nvidia graphics card is built-in among Linux OS)
Step 2: Register the first administrator user
After installation is complete, if you connect to http://localhost:13000, a page for registering an administrator will appear. After signing up, an initial administrator account for ds2.ai is set up.
Step 3: Training AI models
- Easy to build the customized AI model with SOTA algorithms
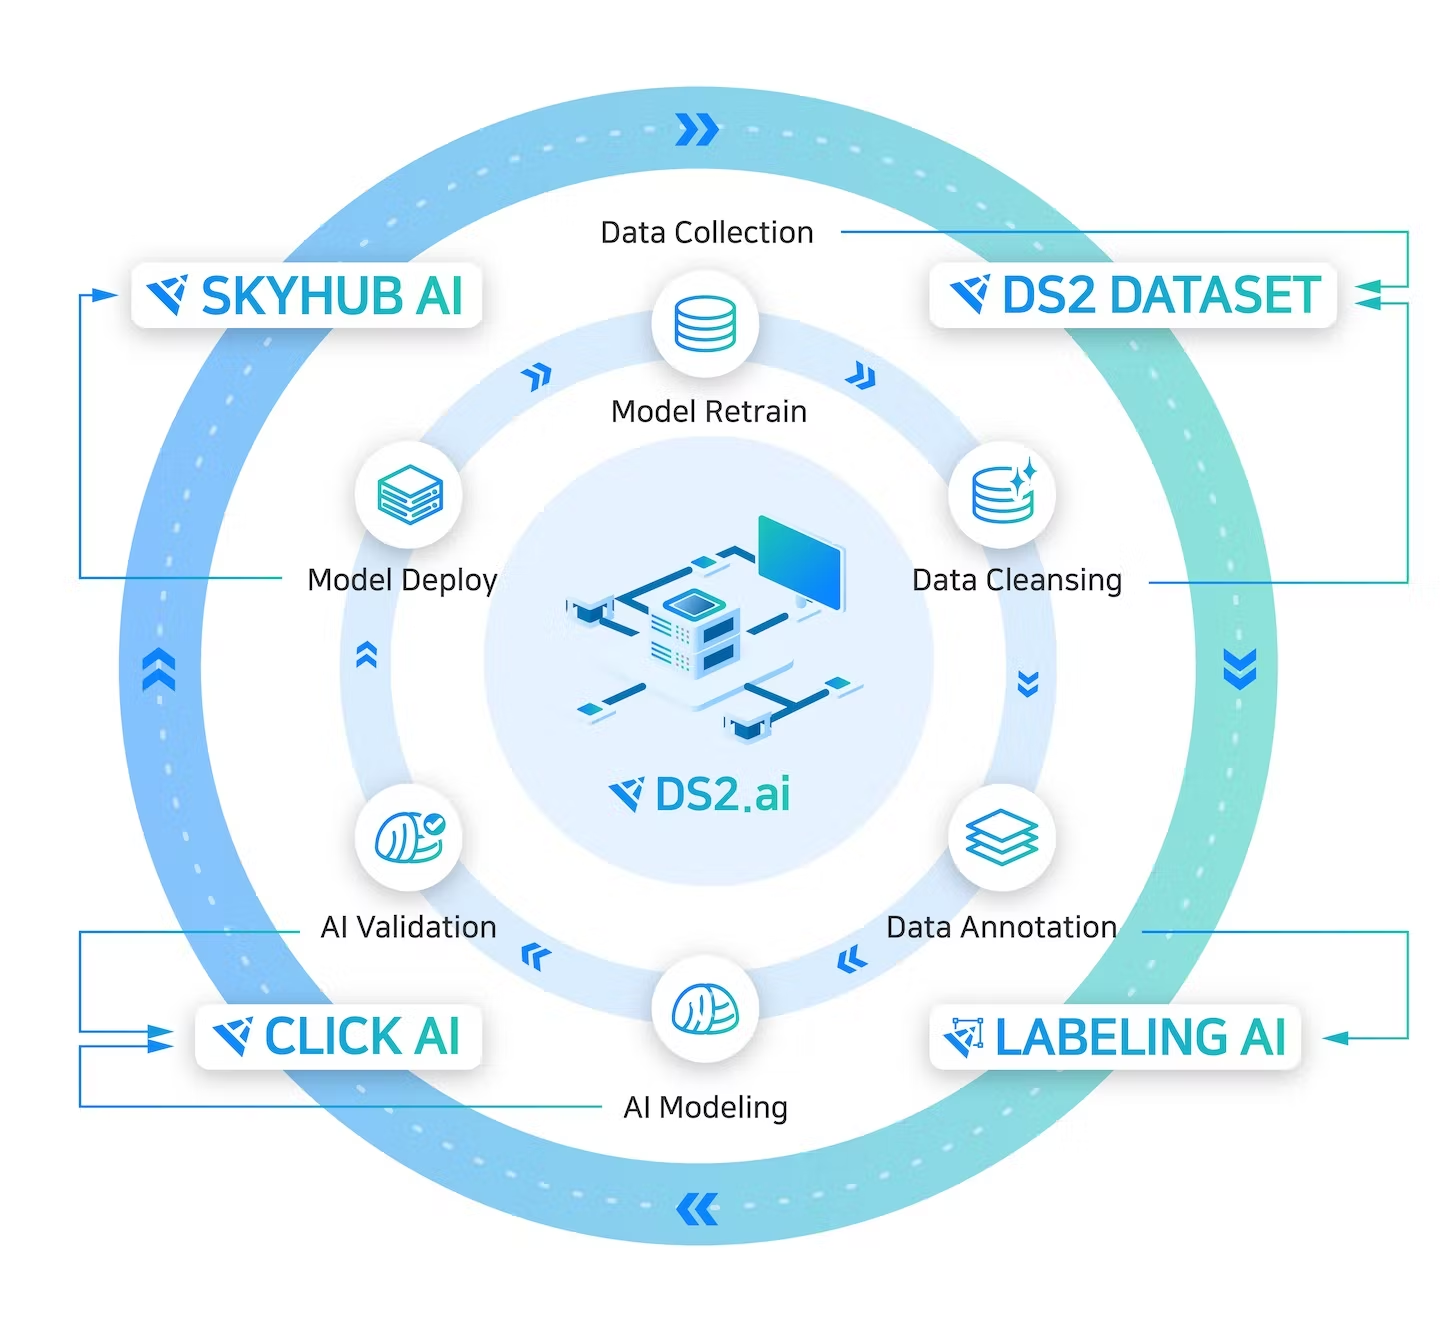
DS2 provides active learning process based on an automated machine learning pipeline.
A deep learning model for executing prescriptive analysis can increase its accuracy as it advances over time, and prescriptive analysis made with such increased accuracy will have higher accuracy. DS2 automatically installs a machine learning pipeline through the Active Learning process to [Learn - Analyze - Deploy - Collect] - [Relearn - Analyze - Deploy - Collect] - … Let us help you do it without much effort.
After labeling is complete, artificial intelligence can be developed using the learning data. Click the “Start AI Development” button on the dataset or labeling project screen to enter the setting screen for AI development.
On the setting screen, three types of development environments are supported.
Manual setting: Select the desired deep learning & machine learning library (Pytorch, Tensorflow, XGboost, etc.)
Fast learning speed (AutoML): A function that creates a model by speeding up the learning rate among AutoML learning techniques
High Accuracy (AutoML): A function that creates a model with high accuracy among AutoML learning techniques
After selecting the desired learning method, click the Start button on the right to start learning. If you click the "Model" tab at the bottom after starting, you can check the progress of the model being developed. It provides the function of "distribute" and the function of "analyzing" through the data set of the prediction result created by the model.
Step 4: Run prescriptive analytics
Once the optimal model has been selected, prescriptive analysis can be run to gain insights from sentences built around explainable AI (XAI).
Step 5 : Deploy AI models
You can use the Deploy Model function by completing training through DS2.ai or uploading a model you have already created to DS2.ai. (The ability to upload models directly supports Pytorch and Tensorflow2 models.)
You can upload by clicking the "Deploy" menu button at the top or distribute the developed model through the "Deploy" function in the "Learning" menu.
The deployed model can be managed through a separate endpoint, and the number of API calls can be monitored.
After the model is deployed, the input and output values used for prediction are automatically stored in the dataset, helping to quickly and easily create AI with higher accuracy through active learning.
Step 6: Start labeling data for relearning
Supports training data labeling tools needed to create artificial intelligence models.
After clicking Labeling on the top menu, upload the dataset, and you can start labeling by selecting the desired function between manual labeling and auto-labeling tool.
Step 7 : Use Python SDK
One of the powerful features of DS2.ai is the manual setting function that can easily set up learning under various conditions to derive an optimal artificial intelligence model.
After completing the installation of the ds2ai Python library, you can start learning using the example below.
You can check the app code by clicking the user name in the upper right corner. You can start learning with the code above after putting this app code as shown below.
After the code is executed, the ability to predict or deploy the job situation and the trained model is available in ds2.ai as-is. For more information on how to use, refer to "SDK | PYTHON" in the left menu.
STEP 8: Easy to use SOTA models
Image to Text
GPT
Translation
Text to Image
and also you can use OCR, Text summary, fill mask, text to speech (TTS). In DS2, you can change the model to another one from Hugging face.
BibTeX entry and citation info of the SOTA models
Next step
The advanced functions can work synergistically not only in the UI, but also by linking with the code you were working on through the API or Python SDK. From the menu on the left of the guide, you can practice various examples through Recipe, and you can use the “Verify” menu to verify AI models or the “Jupyter” menu to manage Jupyter by separating it into multiple ports. It is equipped with functions.
For more detailed guides, you can proceed sequentially through the buttons below.
Last updated


